Topiaries
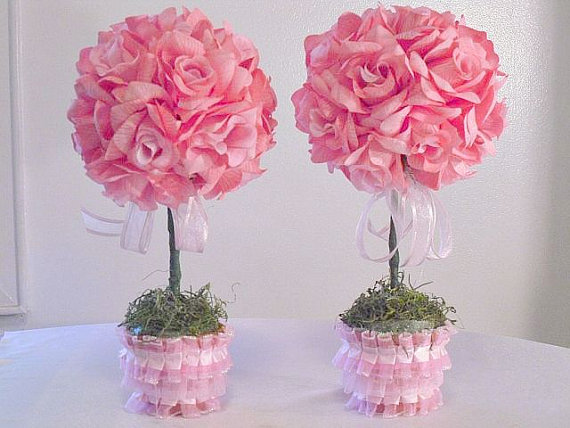
 These beautiful topiaries make wonderful centerpieces for your wedding reception. It is easy to make, and fully customizeable to fit your wedding theme and/or colors by using different flowers, ivy and leaves. If the tables at your reception are large, make larger sized topiaries, or even place 2 or 3 on the table.
Worried about what to do with them after the wedding? Sell them to other soon-to-be brides, keep one or two to keep for yourself (if they match the decor in your home), give them to your bridal party or other female relatives as “thank you” gifts, donate them to hospitals or retirement homes, or give them away to your guests!
MATERIALS NEEDED:
- Container – size of your choice
- Floral foam
- Styrofoam ball or cone or preformed topiary
- 5/8″ dowel rod or branches
- Silk or dried flowers of your choice
- Silk greenery
- 1 yard ribbon or raffia
- Hot glue gun & glue sticks
- Dried moss
- Floral pins
- Wire cutters
- Chenille stem or twist tie
INSTRUCTIONS:
STYROFOAM BALL OR CONE TOPIARY
- Prep all containers – cut floral foam to fit into pot and secure with hot glue. Pot should be about 2/3 full with foam. Cover top of foam with dried moss.
- Cut a 3/8″ dowel rod or branches to a desired length for the stem. Cut each end of the dowel rod or the stem at an angle. This will make it easier to insert into the foam. Once inserted into the floral foam, place either a styrofoam ball or cone at the other end.
- Glue moss onto the styrofoam ball or cone with either hot glue or thick, tacky glue. Be sure to cover completely. This will create a background for either dried or silk flowers and greenery.
- Attach the heads of the flowers with hot glue, in any combination that you find appealing. You can cover completely or just randomly place the flowers. On the cone topiary, you can simply wrap silk ivy garland or runners in a upward fashion, starting at the container. Secure with craft pins.
- Embellish with ribbon or raffia.
TIED TOPIARY
- Prep all containers – cut floral foam to fit into pot and secure with hot glue. Pot should be about 2/3 full with foam. Cover top of foam with dried moss.
- Choose a bundle of flowers that look nice when held together under the heads. Desired size of finished topiary will determine how many flowers to purchase. For example, a small rosebud topiary may take twelve buds, where a small hydrangea topiary only takes three flower heads.
- To determine size of topiary ball, hold flowers together tightly under the heads. Add and subtract flowers at this point until pleasing to the eye.
- To assemble the topiary, twist a piece of chenille stem tightly around the stems up underneath the flower heads. Cut the chenille stem short and tuck into the stems. Repeat this process at the bottom end of the stems.
- Cut stems 3″ to 4″ longer than you want the finished topiary to stand. Shove the stems 3″ or 4″ into the foam inside the container.
- Cut off excess leaves if desired and embellish with ribbon, raffia, baby’s breath,etc…
TIP: Double Topiary
Form one topiary as instructed above, stopping after flowers are tied together. Form a second topiary with equal or more flowers. Before tying the second topiary together, place the flowers around the stems of the first topiary just a few inches below the flower heads. Twist all stems together with a chenille stem under second topiary ball and at the end of the stems. Continue as above and shove into container(steps 4 and 5).
The information on this instruction sheet is presented in good faith, but no warranty is given, nor results guaranteed, nor is freedom from any patent is to inferred. Since we have no control over physical conditions surrounding the application of information herein contained.


